October 7, 2012

Dear Diary...Cooking on a Rainy Day for a Rainy Day

This weekend has been W-E-T wet! So I decided it was time to put my "culinary skills" (ha) to good use. I had been inspired a few weeks back by Natalie over at ATurtlesLifeForMe.  This super mom posted about preparing freezer meals on less than $100 budget for 4 people!
I knew I needed to try this, so I picked up about $15 worth of veggies from my local farmers market and then about $50 worth of meats from the grocery store.


This was my shopping list:

Farmers Market:
-fresh spinach
-4 cloves of garlic
-2 med. spanish onions
-2 green peppers
-2 red peppers
-2 yellow peppers
-3 ears of corn
-1 bag of carrots
-canned sweet roasted red peppers
-1 head of green cabbage
-1 head of purple cabbage
-5 sweet potatoes

Grocery Store:
-3 lbs chicken breasts or tenders
-3 lbs chuck roast
-sirlion steak (enough for 2 servings)
-1 bag of large cooked/peeled jumbo shrimp
-15 pieces of fresh crab meat (fish section)

What I should explain is that none of the food (except the chuck roast & spinach) was cooked in advance. All the meats & veggies were just cleaned, chopped & sorted into portions (2 servings per bag). I also prefer to cook dairy/salt free as much as possible. The only meal that has added sea salt is the chuck roast.

Meal 1 (3 bags - 6 servings):
-Chicken fajitas (3 chicken breasts, 1 green pepper, 2/3 red pepper, 1/2 onion)
 I added cumin & cayenne pepper as seasoning. Cook and serve with tortillas, chips, etc

Meal 2 (3 bags - 6 servings):
-Mixed seafood (15 sticks of crab cut up, 3 cups of shrimp & garlic clove)
Cook and add to pasta & alfredo sauce.

Meal 3 (3 bags - 6 servings):
-Chicken & spinach (3 chicken breasts, 6 cups of spinach cooked down first on stove top, sweet roasted red pepper, 1 garlic clove) Cook and add to pasta, orzo or quinoa.

Meal 4 (2 bags - 4 servings):
-Sirlion Seak (1 sirlion steak, split in 2 for 4 servings. Seasoned with Worcestershire sauce, sea salt & fresh ground peppercorn.) Serve with a roasted ear of corn (1 ear is 2 servings) and salad.

Meal 5 (3 bags - 6 servings):
-Shredded beef fajitas (3 cups shredded chuck roast, 1 green pepper, 2/3 red pepper, 1/2 onion)
 I added cumin & cayenne pepper as seasoning. Cook and server with tortillas, chips, etc

Meal 6 (2 bags - 4 servings):
-Kung Pao Shrimp (2 cups shrimp, 1/2 orange pepper, 1/3 red pepper, 1/2 onion, fresh garlic clove, red pepper flakes). Cook and serve over brown rice (add soy sauce if desired).

Meal 7 (1 bag - 2 servings):
-Dijon chicken (1 chicken breast, 4 tbsp dijon mustard, 2 tbsp maple syrup, 1 tsp rice wine vinegar). Cook and serve with brown rice or quinoa.

Meal 8 (1 bag - 2 servings):
-Lemon chicken (1 chicken breast, 1/2 lemon sliced thinly, white cooking wine) Cook and serve with pasta and alfredo or a light cream sauce.

Meal 9 (1 bag - 2 servings):
-Beef stuffed peppers (1 cup shredded chuck roast, 1 orange pepper cut in half & stuffed with meat). Cook at 350 degrees for 25 min (oven times may vary!)

BONUS!
-Sweet potato fries  Cut 3 sweet potatos into round thins & season with cayenne pepper. Bake for 1 1/2 hrs before freezing. When ready to eat, pop in the oven for 10 min on broil or toast.

-2 sweet potatoes cooked and frozen to enjoy with one of the delish meals above. Cook at 350 degrees for about 20 min (oven times may vary!)

-Baked green cabbage (1 head of green cabbage, cut into 4 thick slices, 1 tbsp butter, 1 tbsp EVOO, Ms Dash salt-free garlic seasoning). Bake at 350 degrees for 25 min (oven times may vary!) I like mine crispy!

-Shredded cabbage salad (1/4 head of shredded green cabbage-I used what was left over from the baked cabbage, 1/4 head shredded of purple cabbage, 1 shredded carrot). Season with 1 tsp sesame seed oil, 1 tsp soy sauce)


Well, that's it! That's what I cooked up this weekend! It will last my family for about 2 1/2 weeks or so. It was worth the few hours it took to prepare, what a stress relief to know I can come home after work, take out a bag & have dinner ready in less than 20 minutes! If this has helped or inspired you, let me know!

Yours truly,
The Decorating Diva

October 3, 2012

Dear Diary...Dressing Up My Kitchen

Have you ever walked around your house and suddenly something jumps out at you that you never noticed before? A few weeks ago, my kitchen windows suddenly seemed very naked. After that, every time I walked through the kitchen (only about 40 times a day!) that was all I could see and I had to dress them!

I stopped by my local Boca Bargoons and found a fresh, floralish print from PKauffman for only $29/yd (vs probably closer to $69 retail-score!) Bonus-it's actually an outdoor fabric which makes it even more suitable-it's made for moisture & South Florida humidity!

First, I measured my window & sliding door and added 2" width & 18" height to the window & 6" width & 18" height to the sliding doors. (You'll see why in a minute). Next I cut the pieces of fabric, intentionally centering the pattern on each piece.

Don't throw your scraps away! Keep scrolling for a special additional DIY project at the end of this post!

I pinned, then sewed under the bottom, then the two sides, leaving the top for last. (Sewing in this order will help to avoid messy corners.) Each seam should be about 1". For the top, I sewed the seam at 2" to leave room for the drapery rod. I chose a tension rod for my window as I had cabinets flanking either side and a single curtain rod for the sliding door.

I had to show off the cute-as-a-button cupcake pin cushion my mom made me! It comes in handy on ALL my sewing projects! (she'll take your orders!)

While I was pinning, Gatsby was doing THIS to my other valance cutting! Needless to say, I had to add an extra step to the process to re-iron & lint roll the fabric...

Back on track, next I measured the total height I wanted my valance to be. (Remember, I still have 15" extra to play with.) I created overlapping folds shown in the below photo & hand stitched them every 4-6" as needed.


About 2 hours & $55 invested, and I wound up with this as my finished product! Not to shabby if I do say so myself!

Now, do you remember when I told you not to throw away your scraps? Well, here's why! "Trash" gets up-cycled in our house! This weekend my husband picked up some new office furniture from Ikea and I nabbed myself a few nice pieces of cardboard from the packing materials.

Rectangular pieces shown below measure 8"x26" (I used 2 for extra sturdiness) and each "pocket" measures 5"x 11" x 8". I've included a FREE template below!


(Score along dotted lines before folding.)

I used my hot glue gun to adhere the fabric to the cardboard. Then used hot glue to attach the pockets to the back support & add the decorative trim.


Voila! A virtually free, one-of-a-kind mail organizer! Hope you enjoyed this week's post, leave me a comment below if you did!

Yours Truly,
The Decorating Diva


September 26, 2012

Dear Diary...My $20 West Elm Inspired Chandelier

It has taken me a looooong time to commit to decorative lighting in our new house. We have very high ceilings and the downstairs has an open floor plan as well so the fixtures not only had to be the right scale, but compliment each other. It was really hard to find the right balance between elegant/glam (me) & modern/contemporary (hubby) UNTIL I found this!

West Elm Small Round Capiz Pendant


But still, it wasn't quite right. The scale was wrong (I was looking for a chandelier size) and the price wasn't either. I know it's asking a lot, but $130.00 wasn't in the budget with all the other reno's we've been doing! Then the clouds parted and I stumbled upon this gem of a tutorial to make my own, for you guessed it.....TWENTY DOLLARS! Holy cow!

Too good to be true you say? Yes and no. What you save in $$ you make up for in the TIME it takes to make this. I spent a good 20 hrs total on mine so do not think you will sit down in one weekend and knock this out. Plan on at least a month with a few hours invested here & there (so you stay sane).

What you'll need:
-wire wreath form ($2.29 at JoAnn)
-white or silver spray paint, unless you want a green wire frame which I did not
-3 rolls of wax paper
-2 spools of beige sewing thread (looks better when thread is darker than the "shells")
-parchment paper
-3 screw hooks
-1.5" round craft punch ($6.99 from Michaels with coupon)
-iron & ironing board


Step 1: Cut 3 sheets of wax paper, place between two sheets of parchment paper so the wax doesn't ruin your iron & ironing board. Iron wax paper thoroughly to make sure the 3 sheets of wax paper meld together completely. Repeat this step until you run out of wax paper. (*hint, I wanted a champagne metallic effect on mine so I lightly dusted my sheets with spray paint after ironing)


(last photo shows one sheet lightly spray painted vs without)

Step 2: Time to punch holes! This is what gets time consuming. Make SURE you get a sharp hole punch, if not, you will be wanting to pull out your hair the way I was. I'll offer some tips, cut your ironed wax paper sheets into strips to make the punching easier, then punch 3-4 strips at a time.
I had to go back and trim a lot of mine because the punch wasn't sharp enough & I got a lot of torn edges but noticed the more I punched at a time the better they came out for some reason.


Step 3: Take your plethora of punched pieces and sew them together to make strands. Choose whatever length you like, I chose 25 pieces per strand.
*Tip-You want to keep the extra thread at the top to tie the strand to the form (bottom threads can be cut).


Step 4: Arranging the strands on the wire form was the fun part! (make sure you've already painted the form & let it dry properly before starting to attach the strands) I started by doing the "inside" layer. This layer was 25 pieces long. The second layer was also 25 pieces long but I draped it over instead of tying it so I had 7 pieces in front &18 pieces "behind" giving the chandelier a 3 layer effect when in fact it only had 2.


Use the screw hooks to install over your existing recessed can, etc and that's about it! Not complicated, just takes some time to do. I am SO happy with mine! We had our housewarming party recently and no one could guess this wasn't an expensive, store bought fixture!


September 19, 2012

Dear Diary...Turning a Dust Collector into Stunning Art

We're all sentimental about our wedding day. Those memories are priceless and I can bet that you, like me, have saved every memento of the occasion. But what do you do with all those mementos? Most of the time they sit around collecting dust, unfortunately!

The flower bouquet is the worst offender. Yes I went there! Don't get me wrong, I'm as sentimental as the next gal but as much as I cherish my wedding bouquet & the memories it holds, lets be honest, it's a dust collector, and it does NOT look pretty anymore!

After taking painstaking measures to move my wedding bouquet safely to our new house, only to have it sit on the very top shelf of my closet to keep the cat from getting to it, and seeing that it was doing nothing but collecting MORE dust, I had enough. 

Beauty may be in the eye of the beholder but you can't argue that this is just sad...


So I put my thinking cap on. I had some lovely shadow box frames from Ikea and some black & white basic fabric. 

I wrapped the fabric around the matting that came with the frames, using my glue gun to adhere the fabric to the matting.

Next, I cut (I know, it was a little painful) each of the roses from their stems & laid them out in a heart shape. Once everything was how I wanted it, I hot glued them in place as well.

For this one, I put the matting at the front to give more feeling of depth & really frame the bouquet to give it the full focus it deserves!

I can't say it enough, I LOVE this piece. It is so special & I am so proud to display it in our living room where everyone can enjoy and appreciate it and the memories it holds!

Oh no, the post doesn't stop here! I was on a roll...I also had some mementos from our Hawaiian honeymoon! You guessed it, the leis!

I decided to do these a little differently and instead, wrapped black fabric around the matting for more of a gallery look.


I love them both and am SO happy I was brave enough to try this! I hope you are inspired to do the same with some similar items or mementos you may have!


September 12, 2012

Dear Diary...Tackling the Guest Room

I've finally made it to a point where I can work on the guest room! I've had a color palette in my head for a while now that I've been ITCHING to do- coral/cream/brown. I started the first piece this weekend-the nightstands!

I picked up this lovely pair from a local thrift shop I frequent called Faith Farm. (If you live in SoFla I highly recommend this place, lots of awesome treasures just waiting for a make-over at below bargain prices).


Beautiful, solid wood tables, just not so crazy about the color. I wanted something fresh and bright-so I went with white!

The process was a little trickier than I thought it would be and I have to tell you I'm not quite finished, there are some touch-ups (and cover-ups) I still need to do.

I loosely followed this process from Living Savvy.

Tips:
-Do NOT skip the drying time! I did and regret it, I have some bubbles from my clear coat. You should wait at least 1 day before applying the glossy clear coat but it does look awesome after about 2 coats! (Add more coats for a lacquered look but no more than 2 a day).
-You need at least 2 cans of colored spray & 1 can of gloss finish per night stand as a rule of thumb. Keep in mind, these were not large nightstands either.


Like I mentioned, I got some bubbles after applying the glossy finish, but fortunately I had some fantastic glossy, embossed reptile paper (from Pearl Paint) that worked in a pinch to cover the drawers. I used the same Rustoleum spray paint from my bathroom accessories make-over post but in a silver finish.

Sometimes these DIY projects take you down a bumpy road but if you keep a positive and creative attitude, you will always wind up with something fabulous & one of a kind!

September 9, 2012

Dear Diary...My Thrifty Purse Organizer

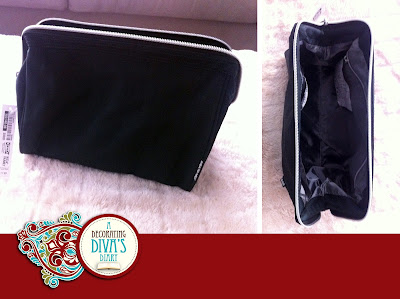
I was meandering through Ikea yesterday and came across a whole new section of travel goodies & accessories. They have a fabulous selection ranging from carry-ons to travel pillows. What caught my interest where their travel toiletry bags.


Pretty neat, huh?
I thought so too...they come in 5 colors, mine is the dark grey:  UPPTÄCKA Toiletries Bag

At first I thought this would make a great new make-up bag (I just might go back for a second!) But then I realized it would make a neat purse organizer. I've seen those cool products that you can organize all your stuff in & then transfer to any purse, just never felt like spending the $$ on one. But THIS I could definitely handle! And looking down into my purse...I realized I had no arguement NOT to get it...I'm a little embarrassed at my mess:


Let me tell you-BEST $5 I ever spent at Ikea! In about 5 minutes my purse went from the hot mess above, to this perfectly organized wonder! (I swear I hear angels sing every time I open my purse now).


If you've got an Ikea close to you, I highly recommend hopping on over & picking one of these up! Heck, it would make an awesome gift too! Fill it with a few goodies (lip gloss, lotion, etc) wrapped up with a pretty ribbon & you've got Christmas covered for your girlfriends!


August 27, 2012

Dear Diary...A Smell Good Secret


For those of you who have ever moved houses, you can empathize with my frustration as I rummage around boxes trying to find that "needle in a haystack". Today it was my air freshener plug in. I have more than one brand but could NOT find a refill match to the Plug-in (I wouldn't be surprised if they got thrown out accidentally during the move!).


I decided to see what would happen if I took one of the refills apart...a pair of needle-nose pliers helped with this experiment. It took a little prying, but I eventually worked it off (don't worry if you somewhat damage the plastic cap in the process, I did & it still went back together fine).


You'll want to rinse out the glass container to prep for the new scent. The wick will keep your old scent for a while, but it will absorb & start to emit the new scent pretty quickly.


Next you'll repeat Step 1 on the refill you are planning to transfer to the original refill bottle. For some reason this cap came off easier than the last, it really depends on the brand you have.

*TIP: Keep the wick from the new refill bottle to place in a bathroom, etc-don't waste the good scent! Just place it on a dish (something non-porous).


Simply pour the oil scent into the original glass refill bottle...


Re-insert the cap & wick, it should pop back in place fairly easily, it should then look like this...
(See, I told you I roughed up the cap a bit, but it still went back on just fine!)


There you have it! Plug in & enjoy!


*TIP: Keep the empty refill bottles, either to do this process again or other fun crafts. I plan to cover my wallflowers with glitter for a Christmas decoration, their particular shape looks like vintage christmas lights!

I DEFINITELY recommend trying this for fall, so many great scents out there to enjoy, don't be restricted to just one brand! What scents have you been wanting to try out?