September 26, 2012

Dear Diary...My $20 West Elm Inspired Chandelier

It has taken me a looooong time to commit to decorative lighting in our new house. We have very high ceilings and the downstairs has an open floor plan as well so the fixtures not only had to be the right scale, but compliment each other. It was really hard to find the right balance between elegant/glam (me) & modern/contemporary (hubby) UNTIL I found this!

West Elm Small Round Capiz Pendant


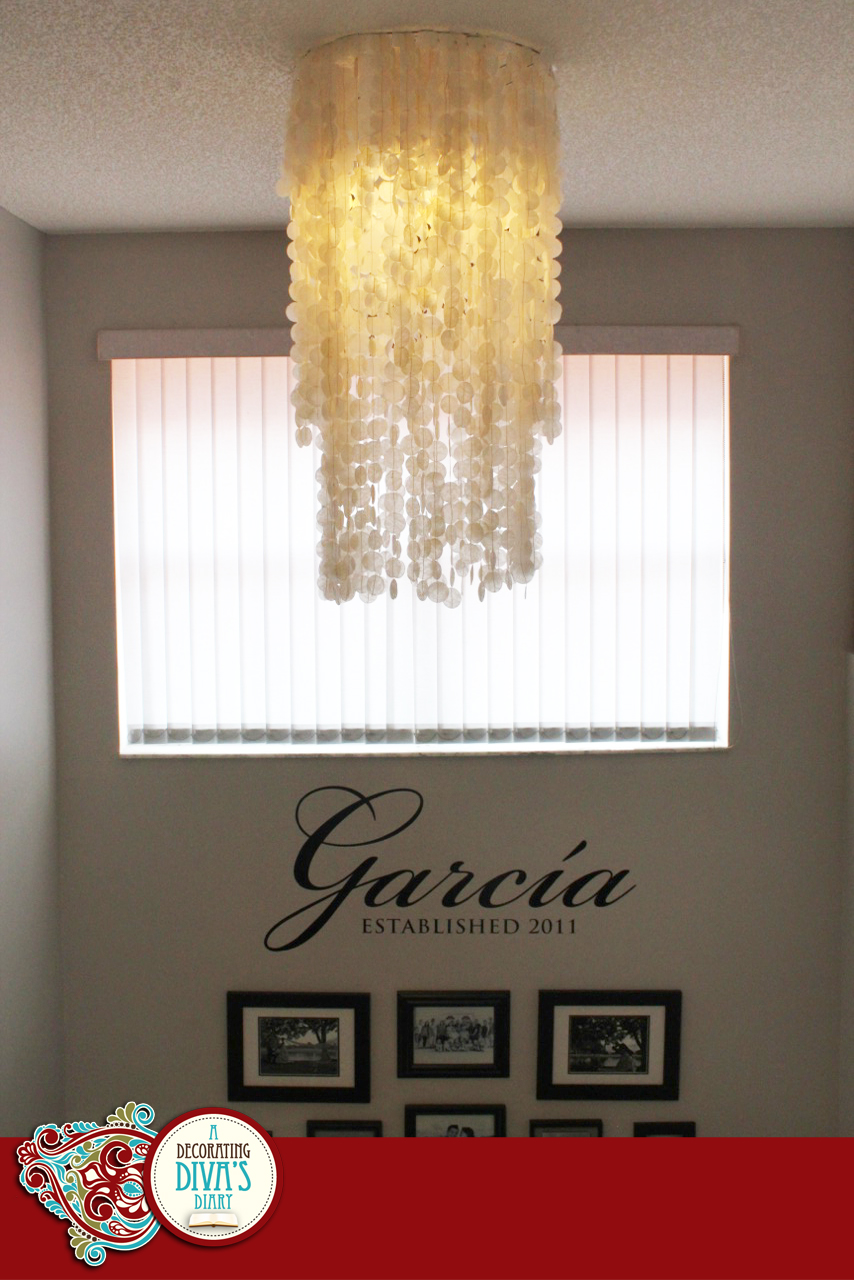
But still, it wasn't quite right. The scale was wrong (I was looking for a chandelier size) and the price wasn't either. I know it's asking a lot, but $130.00 wasn't in the budget with all the other reno's we've been doing! Then the clouds parted and I stumbled upon this gem of a tutorial to make my own, for you guessed it.....TWENTY DOLLARS! Holy cow!

Too good to be true you say? Yes and no. What you save in $$ you make up for in the TIME it takes to make this. I spent a good 20 hrs total on mine so do not think you will sit down in one weekend and knock this out. Plan on at least a month with a few hours invested here & there (so you stay sane).

What you'll need:
-wire wreath form ($2.29 at JoAnn)
-white or silver spray paint, unless you want a green wire frame which I did not
-3 rolls of wax paper
-2 spools of beige sewing thread (looks better when thread is darker than the "shells")
-parchment paper
-3 screw hooks
-1.5" round craft punch ($6.99 from Michaels with coupon)
-iron & ironing board


Step 1: Cut 3 sheets of wax paper, place between two sheets of parchment paper so the wax doesn't ruin your iron & ironing board. Iron wax paper thoroughly to make sure the 3 sheets of wax paper meld together completely. Repeat this step until you run out of wax paper. (*hint, I wanted a champagne metallic effect on mine so I lightly dusted my sheets with spray paint after ironing)


(last photo shows one sheet lightly spray painted vs without)

Step 2: Time to punch holes! This is what gets time consuming. Make SURE you get a sharp hole punch, if not, you will be wanting to pull out your hair the way I was. I'll offer some tips, cut your ironed wax paper sheets into strips to make the punching easier, then punch 3-4 strips at a time.
I had to go back and trim a lot of mine because the punch wasn't sharp enough & I got a lot of torn edges but noticed the more I punched at a time the better they came out for some reason.


Step 3: Take your plethora of punched pieces and sew them together to make strands. Choose whatever length you like, I chose 25 pieces per strand.
*Tip-You want to keep the extra thread at the top to tie the strand to the form (bottom threads can be cut).


Step 4: Arranging the strands on the wire form was the fun part! (make sure you've already painted the form & let it dry properly before starting to attach the strands) I started by doing the "inside" layer. This layer was 25 pieces long. The second layer was also 25 pieces long but I draped it over instead of tying it so I had 7 pieces in front &18 pieces "behind" giving the chandelier a 3 layer effect when in fact it only had 2.


Use the screw hooks to install over your existing recessed can, etc and that's about it! Not complicated, just takes some time to do. I am SO happy with mine! We had our housewarming party recently and no one could guess this wasn't an expensive, store bought fixture!


September 19, 2012

Dear Diary...Turning a Dust Collector into Stunning Art

We're all sentimental about our wedding day. Those memories are priceless and I can bet that you, like me, have saved every memento of the occasion. But what do you do with all those mementos? Most of the time they sit around collecting dust, unfortunately!

The flower bouquet is the worst offender. Yes I went there! Don't get me wrong, I'm as sentimental as the next gal but as much as I cherish my wedding bouquet & the memories it holds, lets be honest, it's a dust collector, and it does NOT look pretty anymore!

After taking painstaking measures to move my wedding bouquet safely to our new house, only to have it sit on the very top shelf of my closet to keep the cat from getting to it, and seeing that it was doing nothing but collecting MORE dust, I had enough. 

Beauty may be in the eye of the beholder but you can't argue that this is just sad...


So I put my thinking cap on. I had some lovely shadow box frames from Ikea and some black & white basic fabric. 

I wrapped the fabric around the matting that came with the frames, using my glue gun to adhere the fabric to the matting.

Next, I cut (I know, it was a little painful) each of the roses from their stems & laid them out in a heart shape. Once everything was how I wanted it, I hot glued them in place as well.

For this one, I put the matting at the front to give more feeling of depth & really frame the bouquet to give it the full focus it deserves!

I can't say it enough, I LOVE this piece. It is so special & I am so proud to display it in our living room where everyone can enjoy and appreciate it and the memories it holds!

Oh no, the post doesn't stop here! I was on a roll...I also had some mementos from our Hawaiian honeymoon! You guessed it, the leis!

I decided to do these a little differently and instead, wrapped black fabric around the matting for more of a gallery look.


I love them both and am SO happy I was brave enough to try this! I hope you are inspired to do the same with some similar items or mementos you may have!


September 12, 2012

Dear Diary...Tackling the Guest Room

I've finally made it to a point where I can work on the guest room! I've had a color palette in my head for a while now that I've been ITCHING to do- coral/cream/brown. I started the first piece this weekend-the nightstands!

I picked up this lovely pair from a local thrift shop I frequent called Faith Farm. (If you live in SoFla I highly recommend this place, lots of awesome treasures just waiting for a make-over at below bargain prices).


Beautiful, solid wood tables, just not so crazy about the color. I wanted something fresh and bright-so I went with white!

The process was a little trickier than I thought it would be and I have to tell you I'm not quite finished, there are some touch-ups (and cover-ups) I still need to do.

I loosely followed this process from Living Savvy.

Tips:
-Do NOT skip the drying time! I did and regret it, I have some bubbles from my clear coat. You should wait at least 1 day before applying the glossy clear coat but it does look awesome after about 2 coats! (Add more coats for a lacquered look but no more than 2 a day).
-You need at least 2 cans of colored spray & 1 can of gloss finish per night stand as a rule of thumb. Keep in mind, these were not large nightstands either.


Like I mentioned, I got some bubbles after applying the glossy finish, but fortunately I had some fantastic glossy, embossed reptile paper (from Pearl Paint) that worked in a pinch to cover the drawers. I used the same Rustoleum spray paint from my bathroom accessories make-over post but in a silver finish.

Sometimes these DIY projects take you down a bumpy road but if you keep a positive and creative attitude, you will always wind up with something fabulous & one of a kind!

September 9, 2012

Dear Diary...My Thrifty Purse Organizer

I was meandering through Ikea yesterday and came across a whole new section of travel goodies & accessories. They have a fabulous selection ranging from carry-ons to travel pillows. What caught my interest where their travel toiletry bags.


Pretty neat, huh?
I thought so too...they come in 5 colors, mine is the dark grey:  UPPTÄCKA Toiletries Bag

At first I thought this would make a great new make-up bag (I just might go back for a second!) But then I realized it would make a neat purse organizer. I've seen those cool products that you can organize all your stuff in & then transfer to any purse, just never felt like spending the $$ on one. But THIS I could definitely handle! And looking down into my purse...I realized I had no arguement NOT to get it...I'm a little embarrassed at my mess:


Let me tell you-BEST $5 I ever spent at Ikea! In about 5 minutes my purse went from the hot mess above, to this perfectly organized wonder! (I swear I hear angels sing every time I open my purse now).


If you've got an Ikea close to you, I highly recommend hopping on over & picking one of these up! Heck, it would make an awesome gift too! Fill it with a few goodies (lip gloss, lotion, etc) wrapped up with a pretty ribbon & you've got Christmas covered for your girlfriends!